

How to use Sony RAW on DaVinci Resolve 18.5
Sony's RAW format is relatively new, or at least has not been described as “Sony RAW” until the launch of Resolve 18.5 on both the public beta and full release versions, the latter having just been released last week. DaVinci Resolve 18.5 is a powerful NLE software that is famous for its color grading control and abilities. It now supports Sony RAW, allowing us Sony filmmakers more control of our footage than ever before. In this blog post, we'll walk you through the step-by-step process of using Sony RAW footage in DaVinci Resolve 18.5 to achieve stunning results and harness the true beauty of your shots. I shoot with the Sony FX6 so this blog is centered around that camera, but I see know reason this doesn’t work with any other Sony footage.
Shooting Guidelines
If your project is going to be heavily involved with post production color correction and grading, I HIGHLY recommend shooting at a minimum of 10 bit log footage. At the bare minimum. In my opinion, it is not even worth the time to color grade 8 bit footage, you might as well shoot in the same color space as your deliverable. You don’t have to shoot at your camera’s maximum fidelity, but at the minimum make sure the footage is at least 10 bit, you will get the most out of this new feature that way.
Importing
Launch Resolve as you normally would. There is no special step in order to have the RAW feature unlock. Once in the project, navigate to the Media page, and use the Media Pool to import your Sony RAW footage. Nothing really changes with our Sony footage until we get to the color tab.
Setting the Project Settings
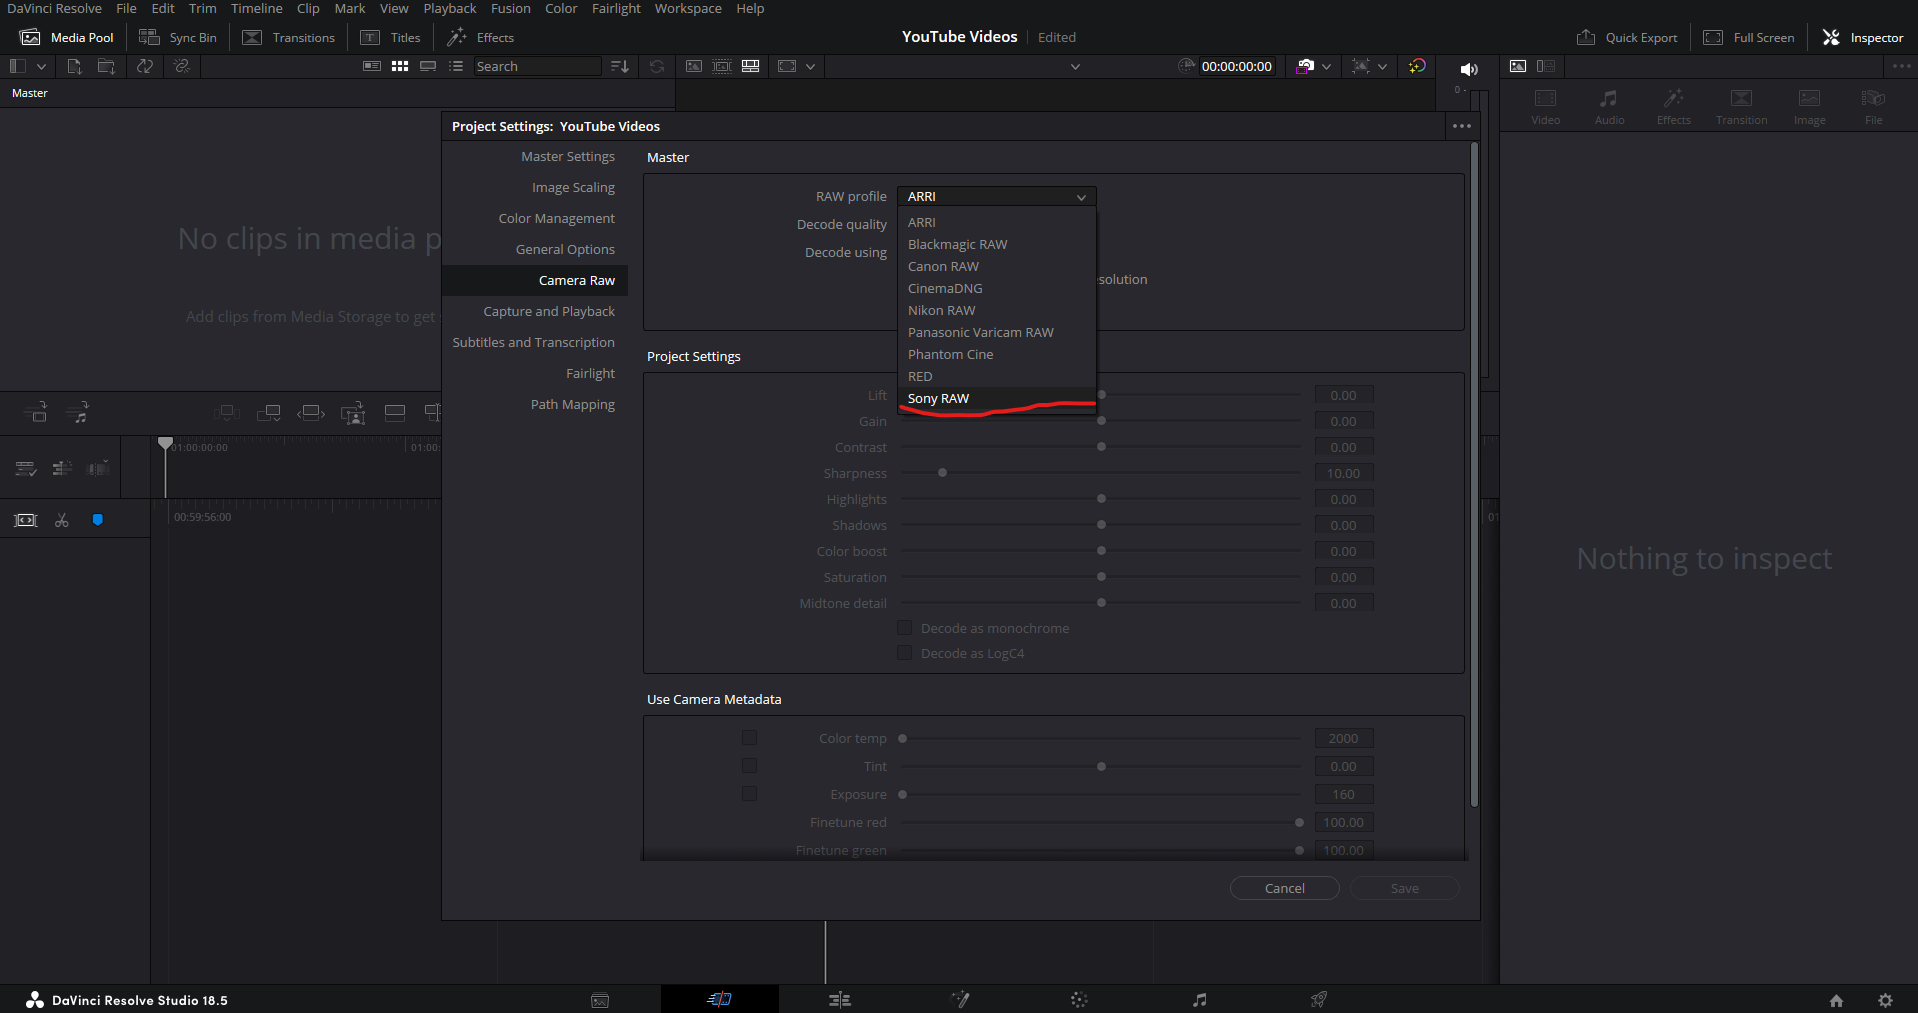
Once your footage is in, go to File -> Project Settings. When the window opens up you will see a variety of tabs on the left hand side. The fifth one down reads “Camera Raw”, click on that one to open up its settings. At the top you will see three tabs with drop down menus next to each of them. Navigate to the one that reads “RAW Profile” and click on it. Navigate down to “Sony RAW” and click on it. I would leave the settings for “Decode quality” and “Decode using” as they are. By default they should be “Full res - Resolve” and “camera metadata”. Hit Save at the bottom and close out. Resolve does recognize Sony RAW footage when it is imported. Setting it up this way should saves us a brief step later on, but it may be bugged at the moment. I have to do additional steps in color tab which I share further down.


Color Management for Sony RAW
You can work as you normally would in Resolve. If you do an ACES workflow, a LUT workflow, it doesn’t matter. The RAW functionality settles right in to whatever workflow you are used to. Sony clips now behave very similarly to that of REDcode RAW, ARRIRAW, and Blackmagic RAW. You have control over white balance, Exposure Index, sharpness, and a variety of other things found in a standard RAW workflow. In order to start working with the RAW footage you need to navigate to the color tab at the bottom of Resolve. Once there, in the bottom left you will find the Camera RAW section in with the color checker, primaries, HDR primaries, RGB mixer and noise reduction tabs. Click on the left most option, the one with a little camera symbol next to it.

If our project settings were set correctly you should be able to make changes on the boxes. If not and they are greyed out, don’t worry just select full res resolve from the Decode Quality box. And change the Decode using box to be clip. That should unlock all the boxes for you. It may be a Resolve 18.5 bug, but I usually have to do this for every clip despite having my project settings to take care of it for me. Voila! We now have access to RAW type controls on our Sony 10 bit footage. So its not true RAW, but it behaves and functions like RAW so I guess maybe it is. Either way, I love the added control and it makes shooting in Cine EI mode way easier. If you shoot at 400 EI in camera, Resolve will automatically reduce the clip’s exposure to reflect what you had monitored while shooting. So now I shoot at 400 EI way more than I used to because I can actually make use of it.

Adjusting RAW Settings
DaVinci Resolve provides advanced controls for adjusting RAW settings. Here, you can fine-tune parameters such as exposure, white balance, color temperature, and tint. All you need to do is drag horizontally across the boxes where the values are or click in the box and type a desired value.
Applying Additional Color Grading
After setting the basic RAW parameters, it's time to get creative with color grading. Now you can go on to grad your footage as you normally would utilizing Resolve's extensive grading tools to enhance the mood, contrast, and overall aesthetics of your footage. Adjusting the clip via the RAW panel DOES NOT apply via a node. So the changes happen upstream of all changes in the node tree so you can manipulate them at any point in the grade and the changes will reflect. However, I would recommend getting all changes to the clip via the RAW panel done during the correction and balancing phase, before moving on to the creative grade. If you start a creative grade and try to go back and adjust a RAW setting it might through everything that you did out of whack.
Exporting and Delivery
Nothing changes on the exporting or delivery side of things, so continue to use Resolve as you would have in previous versions. This new tool is extremely useful as a Sony shooter and I would like to believe that it paves the way for internal RAW recording on the FX series of cameras, or at the very least improved RAW capabilities on the FX cameras.
With DaVinci Resolve 18.5's support for Sony RAW footage, you can unlock the true potential of your shots and achieve professional-grade results. By following the steps in this tutorial, you'll be able to seamlessly import, manage, and color grade your Sony RAW footage, ensuring your final output captures the essence of your creative vision. So, dive into the world of Sony RAW on DaVinci Resolve and elevate your filmmaking to new heights! Keep practicing, keep shooting!

Harnessing Natural Light: Tips for Masterful Outdoor Cinematography
It doesn’t happen overnight, keep practicing!
As a seasoned Director of Photography with over seven years of experience, one of the most exciting aspects of filmmaking is harnessing the beauty of natural light for outdoor cinematography. Unlike controlled studio environments, shooting outdoors presents a unique set of challenges and opportunities. In this blog post, we will delve into essential tips and techniques that will help you elevate your outdoor cinematography skills and capture stunning visuals that resonate with audiences.
Study the Sun's Path:
Understanding the sun's movement throughout the day is crucial for planning your outdoor shots. The sun's position directly affects the quality and direction of light, as well as the shadows it casts. Some really good tools that can aid in this process are app found on the app store like, Helios, Sun Seeker, and Lumos, just to name a few. I personally use Helios and that allows me to track sunrise and sunset times, track the suns position in augmented reality, and even identifies blue and golden hours. Speaking of golden hours, familiarize yourself with the golden hours, which is the hour when the sun rises and also when the sun sets. Golden hour is one of the most cinematic ways to harness natural because of its flattering light quality and light color. In addition, shooting at blue hour, which is the hour BEFORE the sun rises or the hour AFTER the sun sets. Its the time of day where there is still light out but the sun is beyond the horizon, so its just ambient light being bounced off the ozone. The challenge with this hour is that the light levels are much lower than golden hour, but with how sensitive modern sensors are to light, you can get away with it.
Put your Subject between the Sun and your Camera:
This is a technique I employ on every subject that I shoot outdoors. The idea of this workflow is that you are going to use the sun as a backlight, in an attempt to separate the subject from the background. In a controlled setting you would put in a hair light or edge light to do this, but because we only have access to one light source when shooting outside, I find it much nicer to use as a back light as opposed to a key light. If you use the sun as a key light, often times you will see your own shadow on your subject, the light quality is unflattering as its too harsh, and the strength of sun usually makes people squint and struggle to keep their eyes open. A couple things to keep in mind to maximize this technique;
Put the sun behind the subject, but don’t put it in frame. You can’t expose for the sun and you impede on your camera’s dynamic range.
If you need a little light on the face, you can open up your subject to a three-quarters like stance with the camera and you will get some level on the face and maintain some visual interest between light and shadow.
Use Reflectors and Diffusers:
While natural light is beautiful, it can be harsh and create unwanted shadows or highlights. Employ reflectors to bounce light onto your subject, filling in shadows and creating a more balanced look. Whenever I use a reflector, I like to do it in a way where it wraps the sunlight around the face. I do this because it maintains a natural progression of light across the face, which keeps shape on the face, which increases visual interest. The easiest way to do this is have you subject stand at a slight three quarters stance to camera so that you have a place off camera to push the light via a bounce only on to on side of the face. You also want to bounce the light from above the eyes if possible because daylight comes from above in nature, not underneath. On the other hand, you can use diffusers to soften and spread the sunlight, especially during midday when the sun is at its brightest. If you are faced with a challenge where you must have the subject face the sun, using a diffuser will make all the difference and your subject will even thank you for making it easier on them to to perform.
Embrace Cloudy Days:
Contrary to popular belief, overcast days can be a cinematographer's best friend. Clouds act as a giant diffuser, creating soft and even lighting across the scene. This lighting condition is perfect for shooting emotional or intimate scenes, as it eliminates harsh shadows and minimizes distractions. Cloudy days are a great time to shoot, just double check the weather app and make sure there’s no rain in the forecast!
Be Mindful of Exposure:
Maintaining proper exposure is essential when working with natural light. Pay close attention to the camera's exposure settings and use neutral density (ND) filters to control the amount of light hitting the sensor. ND filters is one of the easiest ways to separate your work from others. When exposing the only setting you should ever change is the aperture. ISO must remain at the camera’s native ISO to maintain the highest dynamic range possible, and the shutter speed should be at 180 degrees or two times the frame rate. This maintains that your image retains cinematic motion blur and good exposure. One of the only ways to do this and maintain a shallow depth of field is via a ND filter. If you don’t have one, GET ONE. There are some good ones from Polar Pro, K&F Concept, and Freewell.
Compose with Sun Flares:
Sun flares can add a touch of magic to your outdoor shots, creating a dreamy and ethereal atmosphere. To capture sun flares effectively, position your camera so that the sunlight enters the lens at an angle, resulting in captivating bursts of light. This is particularly effective when you utilize camera movement to bring them in to frame and out of frame. Do a few rehearsal or test shots before you roll for real, to get a sense of where the flares start to play in the shot.
Utilize Silhouettes:
Silhouettes are powerful storytelling tools that can evoke emotion and drama in a scene. When shooting against a bright background, such as a setting sun, position your subjects as dark shapes against the intense light to create striking silhouettes. When you are in locations or scenarios where you can’t control the sunlight, definitely look to employ this technique. Its a simple way to get a very cinematic shot and utilize the situation presented to you.
Adapt to Changing Conditions:
Outdoor cinematography is wholey dependent on the sun which means things will change. Often. Without warning. Natural light is constantly shifting, and weather conditions can change the amount of light in the scene and the quality of light in the scene. Formulate some back up plans so that you can be prepared to and embrace the spontaneity of working with nature to capture unique and unexpected shots. This isn’t always bad. You might get the shot of your production because you were forced to react with nature.
Utilize Negative Fill:
Negative fill is the art of shadow or the process of removing light from a subject. Negative fill is any opaque black material. The larger it is and the closer it is to your subject, the more effect it will have on the image. It does a great job of increasing contrast on the subject, and creating more shape. It was an absolute game changer when I learned of this technique.
Shrink Your Shots:
When I say shrink your shots I mean avoid shooting wider shots. The reason I say this is because it is much harder to have control over natural light in a wider shot. The equipment required to harness natural light for wide shots is far beyond what either you or I could have access to on a daily basis, let alone use safely and correctly. If you know you’re going to be outside shooting, look to shrink your shots down from medium shots down to closeups and really put the extra effort in to manipulate the natural light. I’m not saying to scratch wide shots from your pre-production planning, but look to put effort in to other aspects of cinematography in to your wide shots like camera movement, composition, or color.
Utilizing natural light will not only elevate the visual quality of your films but also set your work apart as its a difficult thing to control. The sun is everything. It is the ONLY light when working outdoors. Remember to study the sun's path so you know where you can put your subject, use reflectors and diffusers to gain some control over the, and be mindful of exposure to create stunning and cinematic outdoor shots. Embrace the challenges and opportunities that working with natural light presents, and let your creativity shine through as you capture captivating visuals that leave a lasting impression on your audience. Keep practicing, keep shooting!
Navigating the Challenges of Low-Budget Filmmaking: Tips and Tricks
It doesn’t happen overnight, keep practicing!
Today, we'll be delving into the world of low-budget filmmaking – an exciting yet challenging journey that many directors of photography embark upon at some point in their careers. As a Philadelphia-based director of photography with over 7 years of experience, I understand the hurdles that come with working on shoestring budgets while striving to create impactful and visually stunning films. In this post, I'll share some valuable tips and tricks I've learned along the way to help fellow filmmakers navigate the challenges of low-budget productions and still produce outstanding results.
Embrace Creativity: Maximizing Minimal Resources
Low budgets often mean limited resources, but they also offer an opportunity for creativity to shine. Explore innovative ways to achieve your vision without breaking the bank. Consider DIY lighting solutions, affordable camera accessories, and alternative approaches to achieve stunning visuals. Make a list of the resources that you have at your disposal so that you can see what you have and what you can do with it. Reach out to your close network and see what other pieces of equipment you can get a hold of. After this process is done, you will know where your strengths lie and where you might want to consider spending money or bringing in help. You may find that you have all the camera and lights necessary for the project, but no good sound workflow. It might be worth spending money for a production sound mixer.
Efficient Pre-Production Planning
Pre-production is where the movie is made. Thorough pre-production planning is crucial when we are talking about working with limited resources and money. Invest time in script analysis, shot listing, and storyboarding to ensure every shot has a purpose. This process will help you to clear your thoughts and see exactly how to best make use of what you have at your disposal. A well-organized production schedule and clear communication with the crew will help minimize wastage and maximize productivity. I would recommend getting a crew together to help alleviate the stresses of production if possible. Even if its friends and family, just some bodies on set to help things move along.
Collaborate with Like-Minded Filmmakers
Networking is essential in the film industry, especially in low-budget filmmaking. Partner with like-minded filmmakers, local talent, and passionate crew members who are willing to work together to bring the project to life. Shared resources and expertise can make a significant difference in the final product. Offer to freelance and work on the sets of other filmmakers in your area. A lot of filmmakers are in the same boat, so you’d be surprised how willing, passionate, and capable other filmmakers are in your area. Do some projects for them and they might be willing to do some work for you. Paying people may not always be possible, I get that, but ALWAYS feed your crew and always try to cover their travel costs or put them up in some sort of lodging if working late or long hours.
Prioritze Essential Equipment
Trust me. I know. I might be the worst when it comes to gear because I want it all. It's tempting to have the latest and greatest gear, focus on acquiring the essential equipment that aligns with your project's requirements. A good camera, a versatile lens kit, and reliable audio gear should be your priorities. Renting specialized equipment for specific shots can also be a cost-effective option. Really take a look at what you are working with and identify the places where your production will be weak or struggle the most. Put the limited money you have there FIRST. You may be a good cinematographer but if you can’t record sound to save your life, your project will only be as good as your sound can be. Filmmaking is a process and it is a collective art. Many pieces go in to a good film and they all must equally be as good for a good final product.
Leverage Natural Lighting and Practical Locations
One of the biggest advantages of low-budget filmmaking is the ability to work with natural light. Embrace it and choose practical locations that enhance the narrative. Conduct thorough location scouts and utilize the available resources in the environment to your advantage. Maintain the camera’s ISO at its base where you get the most dynamic range and shoot with a shutter that’s twice the frame rate in order to maintain cinematic motion blur. These two things will prevent your film from feeling amateur-ish. In addition, if you can get an neutral density (ND) filter to keep a shallow depth or field while outside, your work will be elevated to new cinematic heights. This is one of the biggest difference between shooting “video” and shooting “cinema”.
Invest in Post-Production (Money OR Time)
As I said before, filmmaking is a process, and part of that process is post production. Do not shoot with the intention to fix it in post, but rather shoot with the intention to ENHANCE it in post. There is a stark difference between those two. Fixing it in post never works out the way you want, but designing a shot to later be enhanced in post production is a good way to plan for post production and make use of it. Allocate a portion of your budget to invest in quality editing, color grading, and sound design. A well-crafted post-production process can elevate your film and give it a polished, professional look, even on a limited budget. As a filmmaker, one of my weakest skills is sound recording and sound design. Whenever I set out on a project, I try to make sure I have someone on my team who can perform those tasks for me. If you don’t have the money to invest in post production, make sure you have the time. And vice a versa. You will have to spend one of those two resources, so just be honest with yourself.
Working without resources is difficult when it comes to filmmaking. Try to utilize the elements on your next production and see if it helps you. Rember not to compare yourself to the multi-million dollar movies being made in Hollywood. They are spending millions of dollars a day making these movies. Shrink it all down, work within your means, tell a good story, and keep creating. Make something and move on, we all need to keep practicing, keep shooting!